Vector data – How to upload to Coreo projects
You can add and configure different vector map data in Coreo to use as reference layers within your surveys. Commonly this will include layers showing topographic data or site boundaries.
There are two main steps to the upload process:
- Upload the spatial data to your project using the Coreo Admin Area (https://admin.coreo.io/).
- Configure the data to display the way you prefer in the Map Builder section.
There are currently two ways to upload vector data into Coreo. You can either upload a shapefile directly into the map builder or create a collection using a shapefile or GeoJSON to act as your reference layer.
Uploading your data directly to Coreo
The easiest way to upload vector data in Coreo is to directly import a shapefile. To do so:
- Navigate to ‘Maps & Boundaries’, found under the ‘Project Setup’ header in the side-panel.

- In the ‘Custom’ tab click the ‘Import custom layer’ button.

A box will open giving you a choice of different file types to upload.
- Select ‘Zipped Shapefile’ from the drop down list
- Give your layer a name using the box provided.
- Click the ‘Choose .zip shapefile to upload’ button to select your shapefile.

- Click the blue ‘Add map Layer’ button once the correct file has been selected

Once your layer has been successfully uploaded you will see it listed under other layers.

There are a few options when selecting interacting with your new layer, shown to the right of the layer name.

- Hide Layer: This will hide/unhide your layer on the map

- Zoom to Layer: This will zoom to your layer on the map.

- Edit Layer: This will open up the layer edit options

Customise the appearance of your new layer
Edit layer will provide you with several options for customising your new layer. Options include changing the name, changing the fill colour and changing the border settings.

To change your layers colour:
- Choose the “Primary color” swatch to select the base colour for your layer. In this example we have selected red.

In the ‘Polygon Styling’ section (highlighted below) you can now edit the other features of this polygon’s appearance.

For example:
- Increase the ‘Polygon border width‘ if you would like to make your polygon border more obvious.
Your data configuration is now complete.
- Use the ‘Save’ button to save your edits.
Uploading your data as a collection
You might want to upload your vector data as a collection rather than directly into Coreo. Whilst this method is more labour intensive it enables you to edit the data of the collection after upload rather than the reference layer remaining fixed. In addition more customisation is available in terms of the layer appearance. As such uploading your vector data as a collection might be more appropriate in certain cases.
Coreo accepts both shapefile and GeoJSON formats when uploading vector data as a collection. In this example we’ll upload a shapefile.
- First, navigate to the project you want to add the data to.
- Click the ‘Collections‘ menu under the build header, in the side-panel.

- Select the ‘Upload a collection‘ button.

- Select ‘Zipped Shapefile’ from the drop down list.
- Provide a name for your collection and then navigate to the relevant file on your computer.
- Coreo will then ask you to provide a Key and Value for the shapefile. The Key must be a column that contains unique values for each record. You might need to check the attribute table of the shapefile in your GIS to determine or create this before importing into Coreo.

Once you’ve imported your shapefile, you will see it appear in the collection. The dialogue shown below will list all of the items in your shapefile. In this case, we have just one polygon in one item.

Your new layer will now be available in the ‘Maps and Boundaries’ page to interact with and edit as you would any other layer.
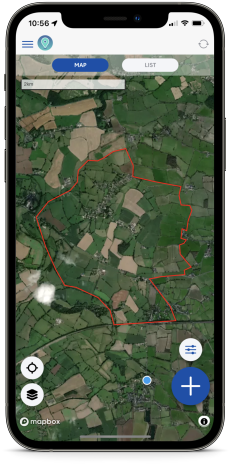
Viewing your new map layers in the Coreo app
To view your new layer in the Coreo app, visit the relevant project and select the Layer Switcher icon.
- Scroll to the bottom of the window until you see the Map Layers section. Toggle the required layer (in this case “New Layer”) to be visible.
- Tap back onto the map to dismiss the Layer Switcher and your boundary will now be visible on the map.